
ADS1115とは
ADS1115 とは4チャンネル16bit A/D 。I2C接続なので、OLEDと共に、WeMos に接続して利用してみる。


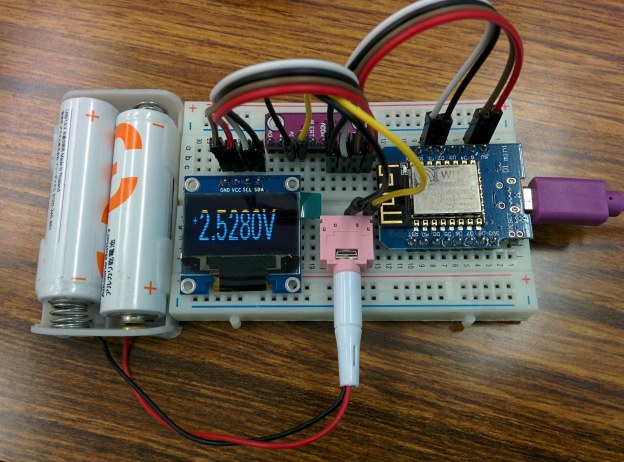
結線
SCL, SDA自由に変更可能。U8g2初期化コマンドでSetupする。

code
#include <Wire.h>
#include <Adafruit_ADS1015.h>
#include <U8g2lib.h>
#include <math.h>


#define WINDOW_SIZE 128

Adafruit_ADS1115 ads;  /* Use this for the 16-bit version */
//Adafruit_ADS1015 ads;     /* Use thi for the 12-bit version */

// Sets up the display to be the 128px x 32px display
U8G2_SSD1306_128X32_UNIVISION_F_HW_I2C u8g2(U8G2_R0, /* reset=*/ U8X8_PIN_NONE, /* clock=*/ SCL, /* data=*/ SDA);

void setup(void)
{
  Serial.begin(9600);
  Serial.println("Hello!");

  Serial.println("Getting differential reading from AIN0 (P) and AIN1 (N)");
  Serial.println("ADC Range: +/- 6.144V (1 bit = 3mV/ADS1015, 0.1875mV/ADS1115)");

  // The ADC input range (or gain) can be changed via the following
  // functions, but be careful never to exceed VDD +0.3V max, or to
  // exceed the upper and lower limits if you adjust the input range!
  // Setting these values incorrectly may destroy your ADC!
  //                                                                ADS1015  ADS1115
  //                                                                -------  -------
  ads.setGain(GAIN_TWOTHIRDS);  // 2/3x gain +/- 6.144V  1 bit = 3mV      0.1875mV (default)
  // ads.setGain(GAIN_ONE);        // 1x gain   +/- 4.096V  1 bit = 2mV      0.125mV
  // ads.setGain(GAIN_TWO);        // 2x gain   +/- 2.048V  1 bit = 1mV      0.0625mV
  // ads.setGain(GAIN_FOUR);       // 4x gain   +/- 1.024V  1 bit = 0.5mV    0.03125mV
  // ads.setGain(GAIN_EIGHT);      // 8x gain   +/- 0.512V  1 bit = 0.25mV   0.015625mV
  // ads.setGain(GAIN_SIXTEEN);    // 16x gain  +/- 0.256V  1 bit = 0.125mV  0.0078125mV


  // Initialize the display
  u8g2.begin();
  ads.begin();

}

// Function to print ${value} with a specific number of ${digits}
void print_digits(double value, short unsigned digits){
  double av = abs(value);
  value = av;
  while(av > 10){
    digits--;
    av/=10;
  }
  u8g2.print(value, digits - 1);
}

int16_t results[WINDOW_SIZE] = {0};
int current_result = 0;

void loop(void)
{
 int time = millis();
  /* Be sure to update this value based on the IC and the gain settings! */
  //float   multiplier = 3.0F;    /* ADS1015 @ +/- 6.144V gain (12-bit results) */
  float multiplier = 0.1875F; /* ADS1115  @ +/- 6.144V gain (16-bit results) */

  double voltage_multiplier = 5333;
  for (int i = 0; i < 16; i++){
    results[current_result] = ads.readADC_Differential_0_1();
    current_result++;
    current_result = current_result % WINDOW_SIZE;
  }
  double result = 0;
  int i;
  for (i = 0; i < WINDOW_SIZE; i++){
    result = result + results[i];
  }
  result = result / (double) WINDOW_SIZE;

  /*Serial.print("Differential: "); Serial.print(results); */
   //Serial.print("(");
   Serial.println(result * multiplier, 5);
   //Serial.println("mV)");

  u8g2.firstPage();
  do {
    // this is where the values get printed to the display
    //u8g2.setFont(u8g2_font_logisoso32_tr); // large 32px tall font

    // other font options can be found at https://github.com/olikraus/u8g2/wiki/fntlistall
    u8g2.setFont(u8g2_font_6x12_tn);

    if (result > 0){
      u8g2.setCursor(0,16);
      u8g2.print("+");
    } else {
      u8g2.setCursor(0,26);
      u8g2.print("-");
    }

    u8g2.setFont(u8g2_font_fur20_tr); // large 20px tall font
    u8g2.setCursor(7,26 );
    double volts = result / voltage_multiplier;

    print_digits(volts, 5);
    u8g2.print("V");

  } while ( u8g2.nextPage() );

  int d = (1000 / 16) - (millis() - time);
  if (d > 0){
    delay(d);
  }
}
動作確認
しかし、テスト結果は、思う通りにならない。
表示は0.0000V、1.0000V、ー1.0000V、の感じで、小数点以下は0000となっている。どうして?
大変の曲がり道して、わかったのは、OLEDの定義が間違え、「U8G2_SH1106_128X64_NONAME_F_HW_I2C」になって、その影響で、読み取り数字が変に。

「U8G2_SSD1306_128X32_UNIVISION_F_HW_I2C」で定義を直したら、普通にA/D変換の結果が表示が出来た。
