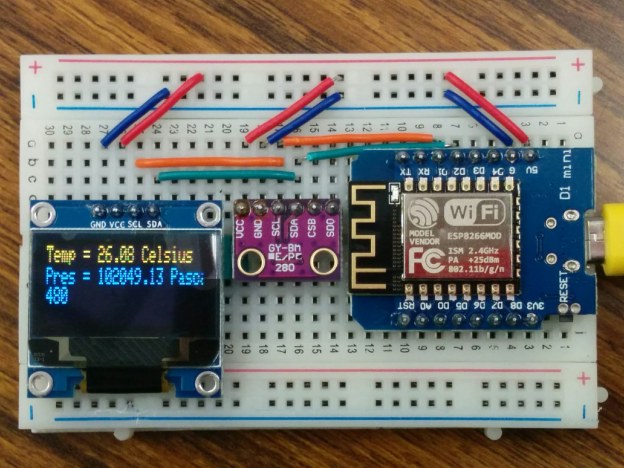
いよいよWiFiManagerを組み込み、理想のIoT-Cloud-Mobile Study Kit (IoT実験キット)の形ができた。
今回の実験はWeMosにhttpサーバを立ち上げて、ブラウザーから接続 を待機;接続するとBMP280センサー情報を返送する。
つまり、スマートフォンまたはPCから直接接続して利用する。この場合ローカル環境の利用に限られ、出かける時でも利用するため、クラウド(例えばTinyWebDB API)が必要だ。
WiFiManagerを組み込みだ、Home IoT Server。
/*
 *
 */
#include <Wire.h>
#include <Adafruit_BMP280.h>
#include <Adafruit_GFX.h>
#include <Adafruit_SSD1306.h>

#define OLED_RESET 0  // GPIO0
Adafruit_SSD1306 OLED(OLED_RESET);

#define BMP_SCK 13
#define BMP_MISO 12
#define BMP_MOSI 11
#define BMP_CS 10

Adafruit_BMP280 bmp; // I2C
//Adafruit_BMP280 bmp(BMP_CS); // hardware SPI
//Adafruit_BMP280 bmp(BMP_CS, BMP_MOSI, BMP_MISO,  BMP_SCK);

#include <ESP8266WiFi.h>
#include <DNSServer.h>
#include <ESP8266WebServer.h>
#include <WiFiManager.h>

int ledPin = BUILTIN_LED;
WiFiServer server(80);

void setup() {
  OLED.begin();
  OLED.clearDisplay();

  //Add stuff into the 'display buffer'
  OLED.setTextWrap(false);
  OLED.setTextSize(1);
  OLED.setTextColor(WHITE);
  OLED.setCursor(0,0);
  delay(10);


  pinMode(ledPin, OUTPUT);
  digitalWrite(ledPin, HIGH);

  // Connect to WiFi network
  OLED.println("wifiManager autoConnect...");
  OLED.display(); //output 'display buffer' to screen

  WiFiManager wifiManager;
  wifiManager.autoConnect();

  OLED.println("WiFi connected");
  OLED.display(); //output 'display buffer' to screen

  // Start the server
  server.begin();
  OLED.println("Server started");

  // Print the IP address
  OLED.print("http://");
  OLED.print(WiFi.localIP());
  OLED.println("/");

  OLED.display(); //output 'display buffer' to screen
  // OLED.startscrollleft(0x00, 0x0F); //make display scroll

  if (!bmp.begin(0x76))
  {
    OLED.println("Could not find BMP180 or BMP085 sensor at 0x77");
    OLED.display(); //output 'display buffer' to screen
    while (1) {}
  }
}

void OLED_show()
{

  OLED.clearDisplay();
  OLED.setCursor(0,0);
  // Print the IP address
  OLED.print("http://");
  OLED.print(WiFi.localIP());
  OLED.println("/");
  OLED.setCursor(0,8);
  OLED.print("Temp = ");
  OLED.print(bmp.readTemperature());
  OLED.println(" Celsius");
  // set the cursor to column 0, line 1
  // (note: line 1 is the second row, since counting begins with 0):
  OLED.setCursor(0,16);
  OLED.print("Pres = ");
  OLED.print(bmp.readPressure());
  OLED.println(" Pascal ");
  // print the number of seconds since reset:
  OLED.setCursor(0,24);
  OLED.print(millis() / 1000);

  OLED.display(); //output 'display buffer' to screen
}

void loop() {
  delay(500);
  // Check if a client has connected
  WiFiClient client = server.available();
  if (!client) {
    OLED_show();
    delay(1);
    return;
  }

  // Wait until the client sends some data
  OLED.println("new client");
  // while(!client.available()){
  //   delay(1);
  // }

  // Read the first line of the request
  String request = client.readStringUntil('\r');
  OLED.println(request);
  OLED.display(); //output 'display buffer' to screen
  client.flush();

  // Match the request

  int value = LOW;
  if (request.indexOf("/LED=ON") != -1) {
    digitalWrite(ledPin, LOW);
    value = HIGH;
  }
  if (request.indexOf("/LED=OFF") != -1){
    digitalWrite(ledPin, HIGH);
    value = LOW;
  }


  // Return the response
  client.println("HTTP/1.1 200 OK");
  client.println("Content-Type: text/html");
  client.println(""); //  do not forget this one
  client.println("<!DOCTYPE HTML>");
  client.println("<html>");

  client.print("Temp = ");
  client.print(bmp.readTemperature());
  client.println(" Celsius <br>");
  client.print("Pres = ");
  client.print(bmp.readPressure());
  client.println(" Pascal <br>");

  client.print("Led pin is now: ");

  if(value == HIGH) {
    client.print("On");
  } else {
    client.print("Off");
  }
  client.println("<br><br>");
  client.println("Click <a href=\"/LED=ON\">here</a> turn the LED ON<br>");
  client.println("Click <a href=\"/LED=OFF\">here</a> turn the LED OFF<br>");
  client.println("</html>");

  delay(1);
  OLED.println("Client disconnected");
  OLED.println("");
  OLED.display(); //output 'display buffer' to screen

}
実験方法:
- プログラム検証
- WeMosにプログラムアップロード
- WeMosのWiFiManeger で接続、AP設定
- WeMosのOLEDでIP確認
- 自動的にhttpサーバを立ち上げ、ブラウザーから接続 を待機
- 接続するとBMP280センサー情報を返送する。

