
最初はプレゼントタイマーを作るつもり。
しかし、TinyebDBの文字列を表示する方がはるかも簡単、汎用性もいい。
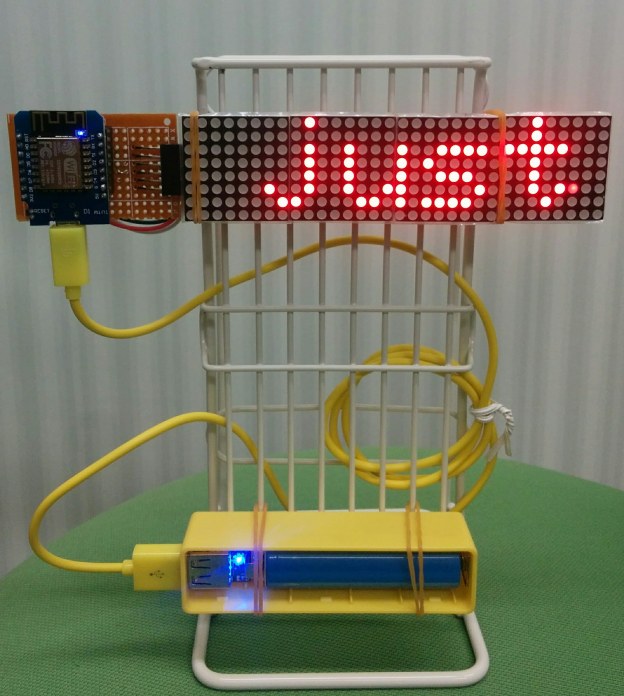
できたものはこれ:

電源が繋いたら、WiFiを自動で接続、それからTinyWebDBから文字列を取得と表示する。
これならプレゼントタイマーだけじゃなく、お知らせ、顔認証して名前で挨拶とかにも活用できそう。
#include <SPI.h>
#include <Adafruit_GFX.h>
#include <Max72xxPanel.h>
#include <time.h>

#include <ArduinoJson.h>
#include <ESP8266WiFi.h>
#include <ESP8266HTTPClient.h>

WiFiClient client;

const char* resource = "http://tinydb.ml/api/";           // http resource
const unsigned long BAUD_RATE = 9600;      // serial connection speed
const unsigned long HTTP_TIMEOUT = 10000;  // max respone time from server
const size_t MAX_CONTENT_SIZE = 512;       // max size of the HTTP response

#include "WiFiManager.h"          //https://github.com/tzapu/WiFiManager

HTTPClient http;

int pinCS = D4; // Attach CS to this pin, DIN to MOSI and CLK to SCK (cf http://arduino.cc/en/Reference/SPI )
int numberOfHorizontalDisplays = 4;
int numberOfVerticalDisplays   = 1;
char time_value[20];

// LED Matrix Pin -> ESP8266 Pin
// Vcc            -> 3v  (3V on NodeMCU 3V3 on WEMOS)
// Gnd            -> Gnd (G on NodeMCU)
// DIN            -> D7  (Same Pin for WEMOS)
// CS             -> D4  (Same Pin for WEMOS)
// CLK            -> D5  (Same Pin for WEMOS)

Max72xxPanel matrix = Max72xxPanel(pinCS, numberOfHorizontalDisplays, numberOfVerticalDisplays);

int wait = 70; // In milliseconds

int spacer = 1;
int width  = 5 + spacer; // The font width is 5 pixels

void configModeCallback (WiFiManager *myWiFiManager) {
  Serial.println("Entered config mode");
  Serial.println(WiFi.softAPIP());
  //if you used auto generated SSID, print it
  display_message(myWiFiManager->getConfigPortalSSID());
}

void setup() {
  configTime(0 * 3600, 0, "pool.ntp.org", "time.nist.gov");
  matrix.setIntensity(10); // Use a value between 0 and 15 for brightness
  matrix.setRotation(0, 1);    // The first display is position upside down
  matrix.setRotation(1, 1);    // The first display is position upside down
  matrix.setRotation(2, 1);    // The first display is position upside down
  matrix.setRotation(3, 1);    // The first display is position upside down

  display_message("wifiManager autoConnect...");

  //WiFiManager
  //Local intialization. Once its business is done, there is no need to keep it around
  WiFiManager wifiManager;
  //reset settings - for testing
  //wifiManager.resetSettings();

  //set callback that gets called when connecting to previous WiFi fails, and enters Access Point mode
  wifiManager.setAPCallback(configModeCallback);

  //fetches ssid and pass and tries to connect
  //if it does not connect it starts an access point with the specified name
  //here  "AutoConnectAP"
  //and goes into a blocking loop awaiting configuration
  if(!wifiManager.autoConnect()) {
    Serial.println("failed to connect and hit timeout");
    //reset and try again, or maybe put it to deep sleep
    ESP.reset();
    delay(1000);
  }

  //if you get here you have connected to the WiFi
  Serial.println("connected...yeey :)");
}

void loop() {
  matrix.fillScreen(LOW);
  get_TinyWebDB("presentationtimer");
  delay(1000);
}

void display_message(String message) {
  if (message.length() > 5) scrool_message(message);
  else {
    for ( int i = 0 ; i < message.length(); i++ ) {
      matrix.drawChar(2 + i * width, 0, message[i], HIGH, LOW, 1); //
    }
    matrix.write(); // Send bitmap to display
  }
}

void scrool_message(String message) {
  for ( int i = 0 ; i < width * message.length() + matrix.width() - spacer; i++ ) {
    //matrix.fillScreen(LOW);
    int letter = i / width;
    int x = (matrix.width() - 1) - i % width;
    int y = (matrix.height() - 8) / 2; // center the text vertically
    while ( x + width - spacer >= 0 && letter >= 0 ) {
      if ( letter < message.length() ) {
        matrix.drawChar(x, y, message[letter], HIGH, LOW, 1); // HIGH LOW means foreground ON, background off, reverse to invert the image
      }
      letter--;
      x -= width;
    }
    matrix.write(); // Send bitmap to display
    delay(wait / 2);
  }
}


void get_TinyWebDB(const char* tag) {
    int httpCode;
    char  tag2[32];
    char  value[128];

    httpCode = TinyWebDBGetValue(tag);

    // httpCode will be negative on error
    if(httpCode > 0) {
        // HTTP header has been send and Server response header has been handled
        Serial.printf("[HTTP] GET... code: %d\n", httpCode);

        if(httpCode == HTTP_CODE_OK) {
            String payload = http.getString();
            Serial.println(payload);
            const char * msg = payload.c_str();
            if (TinyWebDBreadReponseContent(tag2, value, msg)){
                TinyWebDBGotValue(tag2, value);
            }
        }
    } else {
        Serial.printf("[HTTP] POST... failed, error: %s\n", http.errorToString(httpCode).c_str());
        TinyWebDBWebServiceError(http.errorToString(httpCode).c_str());
    }

    http.end();

    delay(1000);
}

// Parse the JSON from the input string and extract the interesting values
// Here is the JSON we need to parse
// [
//   "VALUE",
//   "LED1",
//   "on",
// ]
bool TinyWebDBreadReponseContent(char* tag, char* value, const char* payload) {
  // Compute optimal size of the JSON buffer according to what we need to parse.
  // See https://bblanchon.github.io/ArduinoJson/assistant/
  const size_t BUFFER_SIZE =
      JSON_OBJECT_SIZE(3)    // the root object has 3 elements
      + MAX_CONTENT_SIZE;    // additional space for strings

  // Allocate a temporary memory pool
  DynamicJsonBuffer jsonBuffer(BUFFER_SIZE);

  // JsonObject& root = jsonBuffer.parseObject(payload);
  JsonArray& root = jsonBuffer.parseArray(payload);
  JsonArray& root_ = root;

  if (!root.success()) {
    Serial.println("JSON parsing failed!");
    return false;
  }

  // Here were copy the strings we're interested in
  strcpy(tag, root_[1]);   // "led1"
  strcpy(value, root_[2]); // "on"

  return true;
}

int TinyWebDBWebServiceError(const char* message)
{
}

// ----------------------------------------------------------------------------------------
// Wp TinyWebDB API
// Action        URL                      Post Parameters  Response
// Get Value     {ServiceURL}/getvalue    tag              JSON: ["VALUE","{tag}", {value}]
// ----------------------------------------------------------------------------------------
int TinyWebDBGetValue(const char* tag)
{
    char url[64];

    sprintf(url, "%s%s?tag=%s", resource, "getvalue/", tag);

    Serial.printf("[HTTP] %s\n", url);
    // configure targed server and url
    http.begin(url);

    Serial.print("[HTTP] GET...\n");
    // start connection and send HTTP header
    int httpCode = http.GET();

    return httpCode;
}

int TinyWebDBGotValue(const char* tag, const char* value)
{
    Serial.printf("[TinyWebDB] %s\n", tag);
    Serial.printf("[TinyWebDB] %s\n", value);

    display_message(value);
    delay(1000);
    display_message(value);


    return 0;
}
TinyWebDBに文字列を用意方法はいくつもある。
- HTMLフォームで送信
- App Inventor で簡単なアプリ開発
- cURLで送信
- TinyWebDBサイトを直接いじる。
<h1>TinyWebDB test program</h1>

<form action="http://tinydb.ml/api/storeavalue" method="post">
  <div>tag: <input type="text" name="tag" value="presentationtimer"></div>
  <div>value: <input type="text" name="value" value="12:13"></div>
  <input type="submit" value="submit">
  <input type="reset" value="reset">
</form>